In today's step by step we will learn how to make this beautiful OVAL RUSSIAN MODEL CARPET. This is the second part of the step by step,...
In today's step by step we will learn how to make this beautiful OVAL RUSSIAN MODEL CARPET. This is the second part of the step by step, if you want to see how to start the carpet follow the link below:
Download Graphic Oval Russian Rug


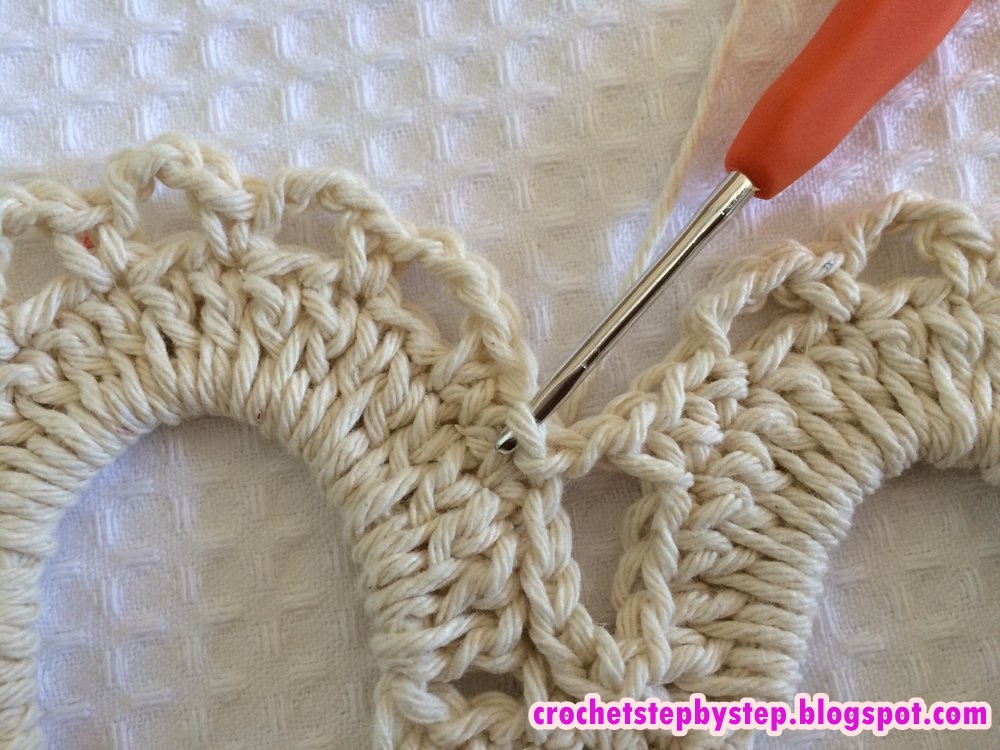
42 - 15th lap - After passing the string to the wrong side, make a chain and again we will work a lap with low points (it can also be half a high point) This time we will only get the wire from the back of the 13th lap , On the 14th lap we made the points on the front wire, this time we will continue the carpet on the back wire, so the 14th lap will be loose forming a relief detailing our carpet! Do all the way around, there are no increases, one point for each base point totaling 260 points. Finish the turn with very low point in the initial current that forms the first point.


Download Graphic Oval Russian Rug
- RUSSIAN OVAL MODEL TAPE - PART 1


MATERIALS
- String number 6 (800g)
- Crochet Needle 3.0mm
- Job size ready 96 x 70
42 - 15th lap - After passing the string to the wrong side, make a chain and again we will work a lap with low points (it can also be half a high point) This time we will only get the wire from the back of the 13th lap , On the 14th lap we made the points on the front wire, this time we will continue the carpet on the back wire, so the 14th lap will be loose forming a relief detailing our carpet! Do all the way around, there are no increases, one point for each base point totaling 260 points. Finish the turn with very low point in the initial current that forms the first point.


43 - 16th and 17th laps - Again make a chain to start the turn and then work again a whole loop with low points, this time taking only the wire from the back of the previous lap so that a wire in the front forming a very beautiful detail On the rug. Do it all the way around. It is normal to be pulling a little, after the next 3 laps it will be normal. If you continue pulling, make sure your point is not too tight!


44 - 18th lap - After finishing the previous lap, make a current of space and then do 5 more low points, this time take the two wires normally ... then do 15 chains, skip 4 base points and fasten with low, Do 5 more points totaling 6 points counting on what we did to hold the handle ...


45 - Again do 15 chains, skip 4 base points and fasten with low, do 5 more lows then completing 6 lows by counting what we hold the 15 chains handle .... Go all the way around, if you did the previous laps properly you should finish the lace by attaching a handle to the starting current, no leftovers or missing points. We will have a total of 26 handles with 15 chains.


46 - 19th lap - After finishing with a very low point, make one more low point on the next low point and then do 2 low points, thus leaving 1 low empty spot before reaching the handle and more what holds the handle.


47 - On the 15-string handle work 21 high points, skip the first low low and hold low, make 1 more low, and work on the next loop again ... do all round and end with low point at low Starts the turn.


48 - 20th lap - Walk low to the third high point of the 21 on the handle, then make low points on the 4th, 5th and 6th high points. Make 3 chains, skip a base point and fasten with low.


49 - Then make 3 chains again, skip 1 base point and fasten with low ... follow until completing 5 loops with 3 chains, after attaching the 5th handle make 2 more points low, see that there are 3 higher points ...


50 - Make a current of space, skip 3 base points of the next fan and hold low, do 2 more lows and then again the 5-handle sequence ... go all the way around and finish with low point.


51 - 21st lap - After finishing lap, follow with low point at the next low points and then make 1 low point inside the first handle. Make 3 chains and 4 more high points, remove the needle and insert in the third chain, lace and pull the string, then fasten with very low point forming 1 point popcorn.


52 - Make two streams of space and in the next wing make another point popcorn ... do in the 5 loops of this first fan.


53 - To pass to the next handle, after attaching the popcorn point make only a current of space, then work popcorn points always with two streams of space ... go all around and finish with very low point in the initial popcorn point.


54 - 22nd lap - After finishing with the lowest point, make 4 points on the first handle. In the second handle do 3 low points, in the third handle do only 4 low points and in the fourth handle do 3 low points.


55 - To pass to the next fan, between a popcorn point and another has only one chain, in this chain we will do nothing. Without running space go to the first handle and make 4 points low, the second handle 3 points low, the third handle 4 points low and the fourth handle 3 points low. Did you see that it always goes in? Follow this way all the way around and finish with a low point in the first low of the 4 that is in the first handle.


56 - 23rd lap - After finishing the previous lap Go to the second point and make the low point, keep making low until just about 2 in this range. See that they are in all 10 lows.


57. Make 5 space streams, skip the 2 low points of this fan and the first 2 of the next fan, attach with low on the third base low point, do 9 more points low and again a handle with 5 chains. Click on the images to enlarge and understand better ... Go all the way around and finish with a very low point above the first low point that starts this turn.


59 - 24th lap - After finishing the previous lap make 1 more low point, then do 6 low points, this way there will be 1 low base low and the second starting the handle.


60 - Then make 10 high points on the handle with 5 chains, skip 1 base point and hold low, note that I do not count the point that is holding the handle, we have to skip an empty base point. Then do another 5 points. Again work 10 high points on the handle with 5 chains ... go all the way around and finish with the lowest point on the first low point that starts this turn.


61 - 25th lap - After finishing the previous lap, make 1 more low point and then do 2 low points, see that there are 2 low base points left.


62 - Make a current of space and let's make triple high point in low relief. Wrap the string 3 times on the needle and then pass the needle from below the top as shown in the third image ... then make the triple high point and a stream of space.


63 - After the current of space, make triple point in low relief taking the second high point ... make a current of space and again triple high point ... follow until completing the 10 points, make a current of space and attach with low in the Second base point, make 1 more point low. It is normal that the last triple high point is a little shrunk, the next time it will get normal.


64 - After the second low point, make a chain and again work triple high points as in the previous step ... go all the way around and finish with a very low point.


65 - 26th lap - After finishing with very low point walk with very low point and make low point inside the first space of a chain that separate 2 triple high points. Do 3 chains of space and attach with low in the next space of a chain ... Continue making handles in all the following spaces, we will have in total 8 handles with 3 chains in this range.


66 - Make 3 chains and space and attach with low in the first space of a chain that separate the triple high points of the second fan. See that the point that was shrunk is normalized. Repeat 8 handles with 3 chains, to move to the next fan again 3 chains ... go all the way around and finish with a very low point.


67 - 27th and last lap - After finishing with very low point make 2 low points in the first handle with 3 chains. Then make 1 point picot (3 chains and attach with low on the top of the second low point) Then go to the second handle and make 2 low points.


68 - After the 2 low points do picot point again and go to the third handle and do 2 low points, again picot point and go to the fourth handle and make 2 low points. Then do 5 chains and attach with low on the top of the second low point, that is, it is exactly like the picto stitch only with 5 chains.


69 - Go to the next handle and do 2 points low and do 1 point picto, follow until finishing the eighth handle with 2 low points, see that there are 3 points picots with chain, 1 point picto with 5 chains and 3 more points picots with 3 chains.


70 - On the handle with 3 chains that separate the fans make only 1 low point, go to the next fan and repeat the previous steps ... go all the way around, finish with low point, cut the wire and finish. Finally rug ready !!!


We have reached the end of yet another step by step, I hope you have enjoyed it and managed to do more of this work.
RUSSIAN OVAL MODEL TAPE - PART 1


COMMENTS